
Start Menu Frozen or Not Working
You can experience a condition where
your Windows 10 device has the Start Menu or Search bar frozen on the screen or
locked out of operation.
The problem can be fixed by manually
powering off the system and restarting the system, however major data may
be destroyed.
Fortunately, it is very easy to fix
a frozen Windows 10 Start Menu. If it doesn’t work well, here are a few ways
you can repair your Windows 10 Start Menu.
Warning: Please backup your data before trying any of the fixes mentioned
below.
1. Using Windows Explorer
This method is the fastest and the simplest way to repair a frozen Windows 10 Start Menu, and in the Task Manager, it simply requires stopping a Windows operation. This won’t work every time, as
you might expect from an easy fix, but it’s worth trying before any complex
fix.
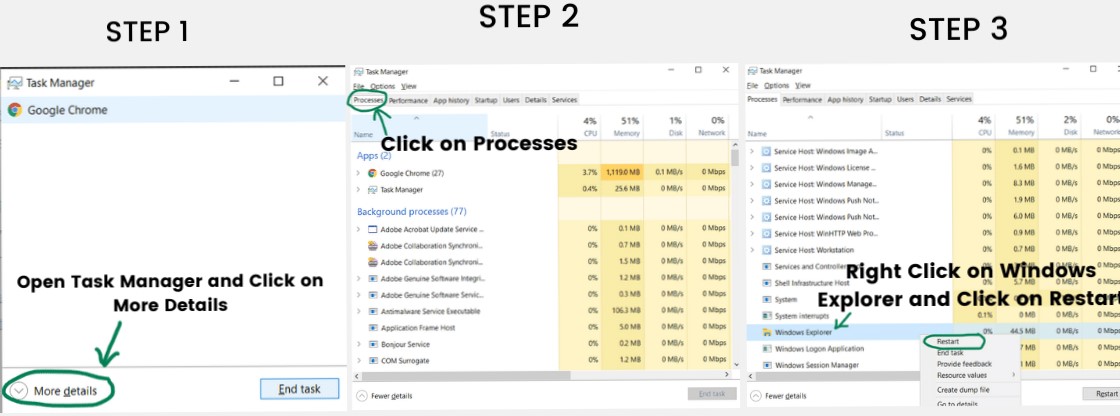
1.
Open Task
Manager by Pressing CTRL+ALT+SHIFT Keys together at the same
time. If you get the popup for User Account Control, then press Yes.
2.
Next, at the
bottom left of the Task Manager window, you need to press “More Details,” which
should open a few tabs across the top like Processes, Performance, App
History, Startup, Users, Details, and Services.
3. Select the PROCESSES tab and find “Windows Explorer”, then right-click on it and Click “Restart”
2. Using Windows Powershell Command
This Powershell command will reset
and restore the Start Menu Button / Search Feature function:
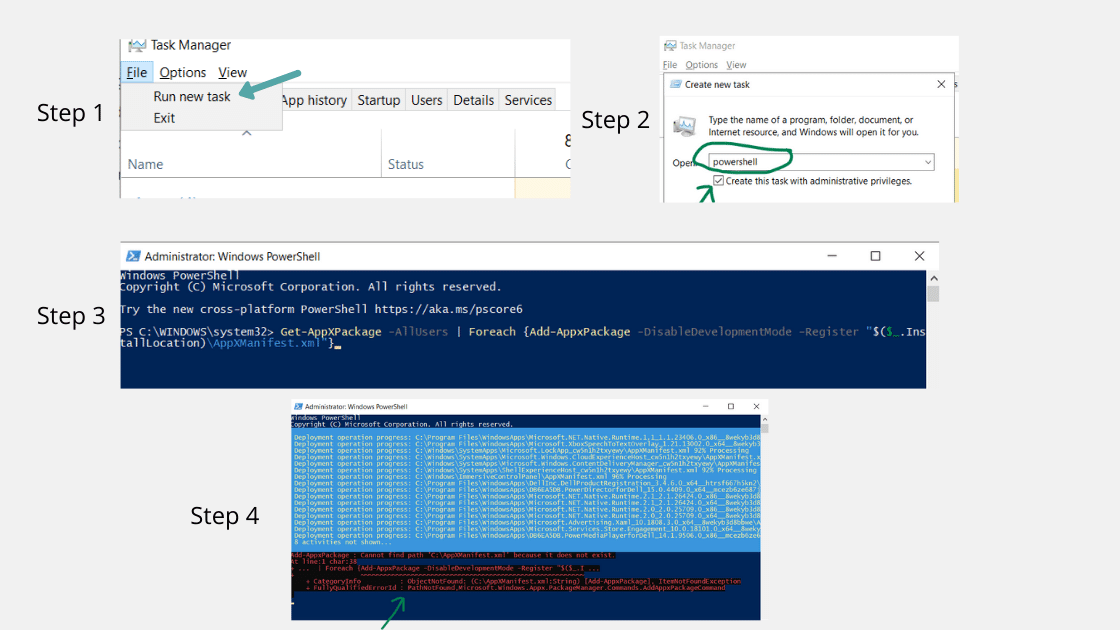
1.
Press
CTRL+ALT+ESC together to open the Task Manager window.
2.
In the Task
Manager window, click on File and select the Run New Task option.
3.
A new Run
windows will popup where you need to type Powershell and check the box create this task with administrative privileges, and
then press Enter Key.
4. A new Powershell windows will open where you need to type the following command and then press Enter.
Get-AppXPackage -AllUsers | Foreach {Add-AppxPackage
-DisableDevelopmentMode -Register “$($_.InstallLocation)\AppXManifest.xml”}
5. Ignore the red text that is created by the command and restart the computer after the command has completed.
3. Using Window sfc /scannow Command
We’re going to use PowerShell again
for this procedure, but it’s a bit less complicated than the above system. If
the first PowerShell patch didn’t succeed, it’s still worth testing this
solution first before the other one.
1.
First of all,
before going any farther, make sure you backup your device. You’ll just need to
make sure that the internet is connected to your machine.
2.
Then, open Task
Manager (press CTRL+SHIFT+ESC together) again, click File,
Click New Task, select Create this task with Administrator Privileges, type
Powershell, and press Enter.
3.
Type the
command sfc /scannow and then press Enter. Here we
are asking the computer to search and mark us for any corrupt files.
What we are looking to see here is a
message that says “Windows Resource Protection found corrupt files but was
unable to fix some (or all) of them” suggesting that during the search it found
errors. If You see this message type the below-mentioned command in Powershell
windows.
DISM
/Online /Cleanup-Image /RestoreHealth
This will cause the program to
scan for a ‘secure’ version of some corrupted file online to overwrite it.
Restart the machine once the process is completed and hopefully your Start menu
problem should be fixed. If you are still facing the same problem there is one
more option that we can try.
3. Using Window 10 Reset Option
In this option, we would guide you
through the steps to reset your Windows PC without losing your files.
Using the Reset with Keep My Files
option, this PC effectively performs a fresh Windows 10 installation while
keeping all your data intact. More importantly, it will locate and back up all
your files, settings, and apps when you select this option from the Recovery
Drive. A fresh copy of Windows is then installed and the files, settings, and
apps that were installed with Windows 10 are restored. Only log in with the
same username and password when the PC restarts, and find all your info.
Now, it’s important to note that
with the Keep My Files option, using Reset This PC does not back up and restore
any desktop apps that you have installed. The Reset This PC tool will
build a list of applications that have not been saved or restored to help you
recall which desktop applications you have installed, so you can determine if
you want to reinstall them.
Steps To Reset The PC
It’s actually easy to Reset This PC
with the Keep My Files option. Completion can take some time, but it is a
simple process.
Open
All Settings → Update & Security → Recovery → Reset this PC
You just need
to follow the on-screen instruction after that and make sure to select Keep My Files option.
Resetting Process:-
·
This Process Remove all apps and programs that didn’t come with
this PC by default
·
Change the user settings back to their defaults
·
It will Reinstall Windows without removing your personal files and
folders.
After this process is complete
hopefully it will fix the Start Menu freezing problem along with any other
issues that you might be unaware of. If you are still facing the issues then
doing a Fresh Installation of Windows 10 is recommended.

